‘HOLEY’ Ciabatta!
June 4, 2008 at 7:29 am | Posted in Breads | 7 CommentsTags: Biga, Breads, Ciabatta, Craig Ponsford's Ciabatta, Italian Slipper Bread
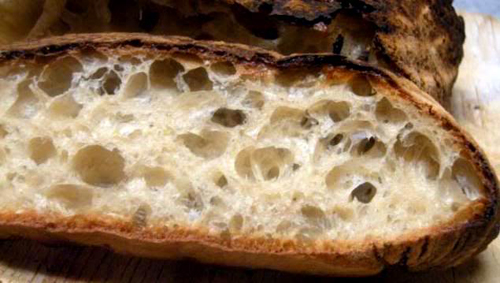
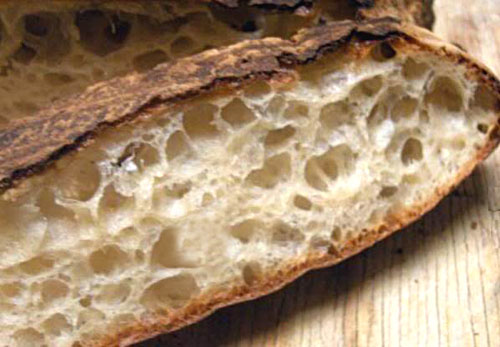
After fiddling around with many a ciabatta recipe, and getting mediocre or shall I say, less than impressive results, (the crumb was never good enough..too tight) I had finally resigned myself to the fact that I just lacked what it took to create that perfect, airy, chewy, riddled with beautiful holes, italian slipper bread. Well, after reading through some books on bread baking at my local bookstore, I came across a recipe for ciabatta by Craig Ponsford. This is BY FAR, the best recipe for ciabatta out there. Now, this is not only because it worked for me, but after perusing through several bread forums, the consensus seems to be the same. His ciabatta is simply the best.
As usual, I’ll run you through what got me to such a beautiful, perfectly crumbed ‘slipper bread’ – (which is called that, because the finished loaf usually looks similar to a slipper) — complete with my inability to take a decent picture with my awful digital camera!
Ciabatta starts with a biga (A more liquid version is called a poolish). What’s a biga? To make it simple and eliminate the need to type it out, I’m using Wikipedia’s definition.
Biga is a type of pre-fermentation used in Italian baking. Many popular Italian breads, including ciabatta, are made using a biga. Using a biga adds complexity to the bread’s flavor and is often used in breads that need a light, open texture with holes. Apart from adding to flavor and texture, a biga also helps to preserve bread by making it less perishable.
Ponsford’s Biga uses a combination of AP, Whole Wheat, Rye and Bread Flours. However, this is the kicker..it calls for 1/384 tsp of yeast. How do you get 1/384 tsp of yeast? Well, he makes it easy. In the recipe.. you take 1/2 tsp yeast and dissolve it in 1 cup of water. You then use only 1/2 tsp of the yeasted water in the biga. I’m amazed at how much the biga rose, considering it was such a teeny amount of yeast to about 3 or so cups of a mix of AP, Bread, Whole Wheat and Rye flours. This biga needed to ferment for 18-24 hours. I started with a fist size lump of dough and I honestly didn’t think it would work with such a small amount of diluted yeast, but lo and behold..we’ve got bubbles and a doubling in size after 12 hours. Unfortunately, I never got to see the full rise, as I slept, and once I woke up, it was at the stage it was supposed to be..lumpy, slightly less bubbly, oatmeal ‘like’.
This is the biga after 12 hours. BTW..the yellow liquid is not hooch. It’s the tiny bit of canola oil I used to grease the container. It somehow doubled itself during the first fermentation. Love how the biga steered clear of it, though.

Next on the agenda was mixing the dough. First the Biga goes into the mixer bowl. Notice the bubbles and elasticity? Good sign.


Next comes, in order, the flour and salt, yeast, then water.

Let this come together using a dough hook (hand kneading would be impossible at this point, since it’s such a wet dough, and the addition of flour to make it manageable would result in a ciabatta with a tight crumb, which defeats the purpose), and let it run for about 5 minutes, until you get what you see in the photo below. See how wet this dough is? Almost like a thick pancake batter. This is the starting point to a light, airy ciabatta with lots of holes. Hydration is SO key here.

Now it’s time to let it ferment for a while, so pour it into a lightly greased container to let it work it’s magic.


You’d never think this dough will actually come together, enough so that it’s more manageable to work with..but it does, with proper stretchings, folds and turns, which you will see below. After an initial 20 minute ferment, the dough is poured onto a lightly floured bench, where it’s gently folded letter style, then put back into the container to ferment for another 20 minutes. This is done at 20, 40, 60 and 80 minutes. The photo below is ready for it’s fourth turn, and you can see how much it has changed. Although still extremely soft (which is how you want it to remain), it’s easier to work with now.

Last fold, bringing in all 4 sides, then put back into the container to rise for 70 to 100 minutes.


I forgot to take a photo of the next rise. However, trust me when I say it doubled in size. Now we can finally prepare and shape the loaves for their final rise. I’ll show you one loaf here. Very gently scraping the dough onto the bench, then folding it again like a letter, only two sides. As with Sourdough, you don’t want to lose any of those bubbles, not to mention this dough is a lot more delicate than sourdough. When folded, lightly seal, pinching the seams closed, gently.
The shaped dough is placed on a floured linen towel or couche (a heavier canvas cloth used to hold the shape of the bread), seam side up. Cover lightly with the floured towel, and let rise for about 45 minutes. During this time, place or move your **baking stone to the middle rack and preheat the oven to 450 F. Ponsford prefers baking his ciabatta on the middle rack, as opposed to other artisan breads, which are usually baked on the bottom rack since that’s where it’s the hottest. Below is the risen loaf.

Now comes the tricky part. You need to flip the dough, seam side down, onto the peel. In the case of a dough this delicate, you need to use parchment paper on the peel since you don’t want to add anymore flour or cornmeal, semolina..etc..not to mention (as I’ve already mentioned 20 times already), it’s such a soft, delicate dough..so it’s much easier to slide onto the stone with the parchment. The ‘flip’ has to be quick, so you don’t degas the dough too much.

Now, the next step kind contradicts everything I mentioned above about handling the dough as to not lose the bubbles and airy texture, but this actually helps the bread’s texture. A bunch of quick. deep dimples all over the loaf. It doesn’t deflate it that much, and oven spring will pop it right back up. The dimpling actually GIVES you more chewy, airy holes in your final loaf. Dimple to the bottom as much as you can, trying to keep the surrounding dough ‘poofy’.

Into the oven, along with a few ice cubes or water into a preheated pan I always keep on the bottom of my oven when bread baking. This adds steam, which you want, for a crispy, final crust. A few sprays of the walls with a water bottle a few times the first 10 minutes, is something you can do too, just to keep that steam going. The below is an awful photo, but if you’ve read my ‘About’ page, you know I’m on a mission to purchase a much better camera. 🙂

After about 40 minutes, it’s ‘photo gallery’ time. Some of these photos were taken in a flourescent lit room, the last two, in the kitchen with the flash. I have to try every setting and room to try and get a decent photo with this joke of a camera!!

** If you don’t own a baking stone, get one. If you don’t want to get one, place the shaped bread seam side down on a lightly greased sheet pan, or one covered with parchment paper or a silpat. Cover and let rise, dimple, and bake as above, on the sheet pan. No flipping onto the peel required.

The recipe for Craig Ponsford’s ciabatta can be found in Maggie Glezer’s Artisan Baking Across America, but if prodded, I’ve been known to send it to those who are really interested. 😉 An even better option would be to check out the full recipe here, at Lindsey’s Luscious blog. While you’re at it, check out her whole blog! Great recipes, blogging and photos!


 </
</


