Daring Bakers – Playing with Pizza prior to surgery
November 1, 2008 at 1:24 pm | Posted in Breads, Daring Bakers, Dinner, Lunch, Vegetables | 16 CommentsTags: Chevre, Cream, Daring Bakers, garlic, Pizza class, Pizza Roasted Vegetables
Welp, it’s now confirmed, I’m FINALLY having surgery to reattach the ligaments in my right knee this coming Monday (November 3rd), barring any problems that arise prior to then. Since the hospital stay, I’ve been in a facility that provides physical therapy due to my original orthopedist assuming I could heal most of my ligaments through therapy, and do fine without an ACL. Thank god for second opinions, as not only did my ligaments NOT heal since I was putting weight on my knee in physical therapy each day, but one of my important ligaments would have been beyond repair if we’d waited any longer!
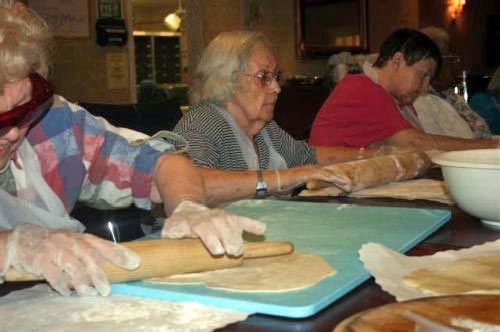
OK, that was the update..but how does this pertain to this month’s DB challenge, you ask? Well, I have not been able to bake or cook anything for over a month, and I thought I’d miss out on several DB challenges, not to mention other challenges I take part in AND of course, cooking on a daily basis at home or work (insert frown) . However, I lucked out. Even though I can’t walk, much less put more than 2% weight on my right leg, I still have use of the two most important kitchen tools in the world – my hands *wiggling and waving fingers*. Upon hearing of my plight to get back into the kitchen again, Brenda, the recreational director here, generously offered up the recreation kitchen to me, suggesting that it would be great to turn it into a pizza class-demo. Naturally, I jumped at the chance, considering not being able to cook and bake for so long is akin to Heroin withdrawal for me (NOT that I ever used Heroin, thank you, but the longing to cook and/or bake was purdy severe!).
Before I go any further, I’d like to thank this month’s host, Rosa of Rosa’s Yummy Yums and offer my condolences upon hearing of the sudden passing of Sher earlier this year, who planned this challenge with Rosa. I never had the pleasure of meeting her, but I can tell she was a great gal, not to mention a great cook!
Now that the date for my pizza demo was set (October 29th, the posting date – go figure), and ONCE My family lugged tons of my kitchen equipment (baking stone, peel, my favorite knife for all the slicing and dicing I planned to do, my pepper grinder, all kinds of toppings, among many other things I needed) to the rehab center, we were ready to go. I planned out my own pizza for this challenge, but for everyone else I cooked up a simple marinara sauce, provided a variety of cheeses, mushrooms, pepperoni, fresh basil (they just happened to have purple basil growing in the herb garden here, and although probably on it’s last legs, it was still fragrant and lovely), a myriad of Fall vegetables which I roasted for my pie, so they could create their own pizzas. I made a double batch of the dough to insure there would be enough for everyone, and there was. I would say about 16-18 people showed up, maybe half to just watch.
Thanks so much to Brian, Melissa, Katarzyna et al,.. for all the help, not to mention running around grabbing the ingredients and equipment I needed (every time I asked) since I couldn’t do much more than wheel my lame (literally) self to the prep table!
Although a little chaotic (pizza dough was being rolled on paper place mats as there were not enough boards, the electric oven in the kitchen seemed to have an adverse effect on the dough, regardless of the preheated baking stone, resulting in a very light crust AND the oven started smoking so much that the pizza baking had to stop before I could put together and bake mine) it was a a lot of fun, and everyone seemed to enjoy it very much, even raving over the flavors and texture of all of the personal pizzas.
As for the tossing of the dough, since we had to wear gloves according to the center’s rules, it was impossible to spin, stretch, and toss it up wiithout it sliding off the gloves. However, Katarzyna, the center’s baking wunderkind who was such a great help to me considering I couldn’t stand and had to do everything in my wheelchair, managed to get that dough going. Although she also couldn’t toss it up in the air due to the gloves, she got some serious spin and stretch on it, resulting in a super thin and perfect disk of dough.
After the demo, it was time to create my pizza. However, as mentioned above, I had to wait until late the next day due to the smoking oven. When all was finally resolved, and the main kitchen graciously let me chuck my baking stone into one of their industrial ovens, I went to work.
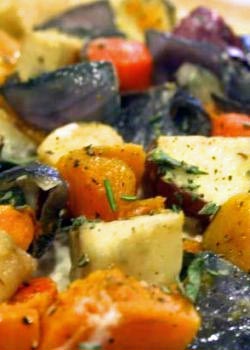
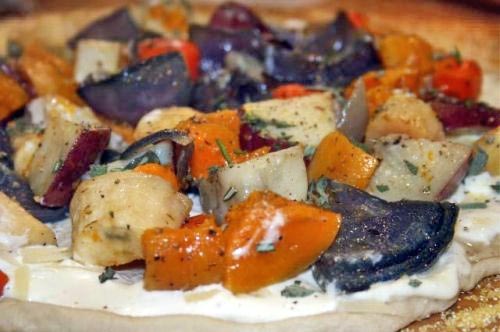
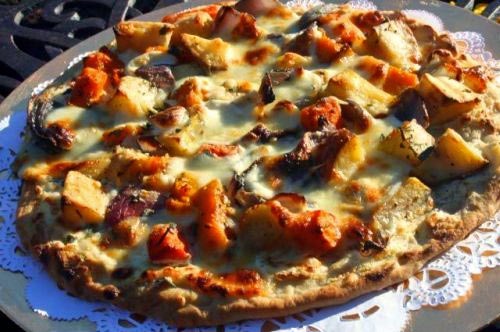
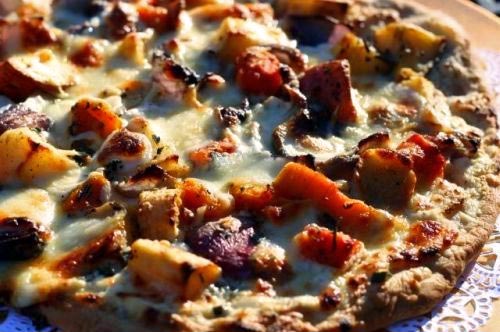
I originally wanted to create two pizzas, one a dessert-cheese plate type of pie consisting of caramelized apples atop a layer of frangipane, overlapping with or topped with brie, but due to time constraints and an achy leg, I decided to just make my savory pizza. I wanted to invoke the colors and flavors of Fall, since it’s my favorite season, so I decided on roasted fall vegetables on top of a chevre-roasted garlic cream sauce with rosemary. Although the pizza already contained a cheesy base, I really didn’t think it would suffer with a mound or two of fresh mozzarella and a little shredded parmesan ;D. A bit of chopped sage and rosemary was the final touch.
Even though the dough didn’t brown or puff much (I don’t know if it was the recipe or the electric oven in the rec kitchen) , it was still quite flavorful and crispy/chewy. Most seemed to like it, although I prefer two other pizza dough recipes I’ve been using for years.
When it comes to the roasted vegetable topping, remember, carrots and parsnips take longer to cook than potatoes and squash, so cutting them a little smaller than the potatoes and sqaush or roasting them separately would be a good idea. Unfortunately, due to unfamiliar surroundings, rushing etc..I didn’t check the carrots and parsnips for tenderness, so they still had some bite to them on the pizza, which I didn’t like (unless you’re cravin’ a crudite pizza!).
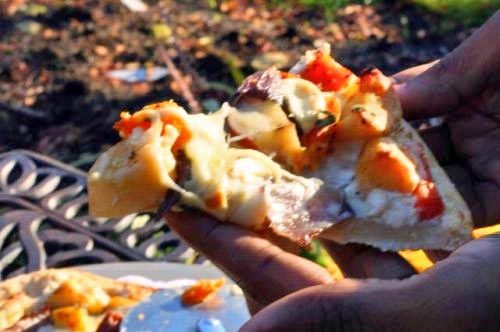
Below are Brian’s hands holding a slice perfectly still while I rapidly snapped photos. Any longer, and he may have keeled over. Thanks, Brian 🙂
And now onto the recipe. The pizza dough chosen by Rosa and Sher is from The Bread Baker’s Apprentice: Mastering the Art of Extraordinary Bread by Peter Reinhart (The same book the below lavash crackers came from, a MUST HAVE for lovers of bread baking) Like the lavash crackers, the following recipe for the pizza dough gives you instructions for gluten AND gluten-free dough.
Basic Pizza Dough
Ingredients
- 4 1/2 Cups (20 1/4 ounces/607.5 g) Unbleached high-gluten (%14) bread flour or all purpose flour, chilled –FOR GF: 4 ½ cups GF Flour Blend with xanthan gum or 1 cup brown rice flour, 1 cup corn flour, 1 cup oat flour, 1 ½ cup arrowroot, potato or tapioca starch + 2 tsp xanthan or guar gum
- 1 3/4 Tsp Salt
- 1 Tsp Instant yeast – FOR GF use 2 tsp
- 1/4 Cup (2 ounces/60g) Olive oil or vegetable oil (both optional, but it’s better with)
- 1 3/4 Cups (14 ounces/420g or 420ml) Water, ice cold (40° F/4.5° C)
- 1 Tb sugar – FOR GF use agave syrup
- Semolina/durum flour or cornmeal for dusting
DAY ONE
Method:
1. Mix together the flour, salt and instant yeast in a big bowl (or in the bowl of your stand mixer).
2. Add the oil, sugar and cold water and mix well (with the help of a large wooden spoon or with the paddle attachment, on low speed) in order to form a sticky ball of dough. On a clean surface, knead for about 5-7 minutes, until the dough is smooth and the ingredients are homogeneously distributed. If it is too wet, add a little flour (not too much, though) and if it is too dry add 1 or 2 teaspoons extra water.
NOTE: If you are using an electric mixer, switch to the dough hook and mix on medium speed for the same amount of time.The dough should clear the sides of the bowl but stick to the bottom of the bowl. If the dough is too wet, sprinkle in a little more flour, so that it clears the sides. If, on the contrary, it clears the bottom of the bowl, dribble in a teaspoon or two of cold water.
The finished dough should be springy, elastic, and sticky, not just tacky, and register 50°-55° F/10°-13° C.
Or
2. FOR GF: Add the oil, sugar or agave syrup and cold water, then mix well (with the help of a large wooden spoon or with the paddle attachment, on low speed) in order to form a sticky ball of dough.
3. Flour a work surface or counter. Line a jelly pan with baking paper/parchment. Lightly oil the paper.
4. With the help of a metal or plastic dough scraper, cut the dough into 6 equal pieces (or larger if you want to make larger pizzas).
NOTE: To avoid the dough from sticking to the scraper, dip the scraper into water between cuts.
5. Sprinkle some flour over the dough. Make sure your hands are dry and then flour them. Gently round each piece into a ball.
NOTE: If the dough sticks to your hands, then dip your hands into the flour again.
6. Transfer the dough balls to the lined jelly pan and mist them generously with spray oil. Slip the pan into plastic bag or enclose in plastic food wrap.
7. Put the pan into the refrigerator and let the dough rest overnight or for up to thee days.
NOTE: You can store the dough balls in a zippered freezer bag if you want to save some of the dough for any future baking. In that case, pour some oil(a few tablespooons only) in a medium bowl and dip each dough ball into the oil, so that it is completely covered in oil. Then put each ball into a separate bag. Store the bags in the freezer for no longer than 3 months. The day before you plan to make pizza, remember to transfer the dough balls from the freezer to the refrigerator.
DAY TWO
8. On the day you plan to eat pizza, exactly 2 hours before you make it, remove the desired number of dough balls from the refrigerator. Dust the counter with flour and spray lightly with oil. Place the dough balls on a floured surface and sprinkle them with flour. Dust your hands with flour and delicately press the dough into disks about 1/2 inch/1.3 cm thick and 5 inches/12.7 cm in diameter. Sprinkle with flour and mist with oil. Loosely cover the dough rounds with plastic wrap and then allow to rest for 2 hours.
Or
8. FOR GF: On the day you plan to eat pizza, exactly 2 hours before you make it, remove the number of desired dough balls from the refrigerator. Place on a sheet of parchment paper and sprinkle with a gluten free flour. Delicately press the dough into disks about ½ inch/1.3 cm thick and 5 inches/12.7 cm in diameter. Sprinkle the dough with flour, mist it again with spray oil. Lightly cover the dough round with a sheet of parchment paper and allow to rest for 2 hours.
9. At least 45 minutes before making the pizza, place a baking stone on the lower third of the oven. Preheat the oven as hot as possible (500° F/260° C).
NOTE: If you do not have a baking stone, then use the back of a jelly pan. Do not preheat the pan.
10. Generously sprinkle the back of a jelly pan with semolina/durum flour or cornmeal. Flour your hands (palms, backs and knuckles). Take 1 piece of dough by lifting it with a pastry scraper. Lay the dough across your fists in a very delicate way and carefully stretch it by bouncing it in a circular motion on your hands, and by giving it a little stretch with each bounce. Once the dough has expanded outward, move to a full toss.
Or
10. FOR GF: Press the dough into the shape you want (about 9-12 inches/23-30 cm in diameter – for a 6 ounces/180g piece of dough).
NOTE: Make only one pizza at a time.
During the tossing process, if the dough tends to stick to your hands, lay it down on the floured counter and reflour your hands, then continue the tossing and shaping.
In case you would be having trouble tossing the dough or if the dough never wants to expand and always springs back, let it rest for approximately 5-20 minutes in order for the gluten to relax fully,then try again.
You can also resort to using a rolling pin, although it isn’t as effective as the toss method.
11. When the dough has the shape you want (about 9-12 inches/23-30 cm in diameter – for a 6 ounces/180g piece of dough), place it on the back of the jelly pan, making sure there is enough semolina/durum flour or cornmeal to allow it to slide and not stick to the pan.
Or
11. FOR GF: Lightly top it with sweet or savory toppings of your choice.
12. Lightly top it with sweet or savory toppings of your choice.
Or
12. FOR GF: Place the garnished pizza on the parchment paper onto the stone in the oven or bake directly on the jelly pan. Close the door and bake for about 5-8 minutes.
NOTE: Remember that the best pizzas are topped not too generously. No more than 3 or 4 toppings (including sauce and cheese) are sufficient.
13. Slide the garnished pizza onto the stone in the oven or bake directly on the jelly pan. Close the door and bake for abour 5-8 minutes.
Or
13. FOR GF: Follow the notes for this step.
NOTE: After 2 minutes baking, take a peek. For an even baking, rotate 180°.
If the top gets done before the bottom, you will need to move the stone or jelly pane to a lower shelf before the next round. On the contrary, if the bottom crisps before the cheese caramelizes, then you will need to raise the stone or jelly.
14. Take the pizza out of the oven and transfer it to a cutting board or your plate. In order to allow the cheese to set a little, wait 3-5 minutes before slicing or serving.
Roasted Garlic Chevre Cream Sauce
Ingredients
- 4 oz chevre or any mild, soft goat cheese
- 4 cloves roasted garlic
- 1/2 cup heavy cream
- 1 teaspoon finely chopped fresh rosemary
Directions
in a small saucepan over low heat, whisk together the chevre, roasted garlic, cream, and rosemary until the mixture is well blended and heated thoroughly.
Makes enough sauce for 3 medium or 2 large pizzas
Roasted Fall Vegetables
Ingredients
- 1 1 lb Butternut squash, cut into 1 inch pieces
- 1 lb red new potatoes, quartered
- 2 medium red onions, quartered
- 1/2 lb parsnips, cut into 1 inch pieces
- 1/2 lb carrots, cut into 1 inch pieces
- Olive oil
- Kosher salt and fresh black pepper
Directions
1. Preheat oven to 450 degrees F. Spread vegetables on a baking sheet. Drizzle with enough olive oil to lightly coat all the veggies. Sprinkle with salt and frsh cracked black pepper, then toss to coat all.
2. Roast until vegetables are tender and beginning to brown, 40 to 50 minutes, tossing them every 10 minutes or so. To store, if you’re making the pizzas at a later time..: let cool, place in an airtight container, and refrigerate up to 3 days. Pour off any accumulated liquid before using.
Additional Toppings
- Fresh Mozzarella cheese
- Fresh, shredded or grated parmesan cheese
- 1 Tablespoon chopped Rosemary
- 1 Tablespoon chopped Sage
Makes enough for 3 medium or 2 large pizzas
To Assemble the Pizzas
Spread rolled out dough with enough of the chevre cream sauce to cover. Top with some roasted vegetables and then as much mozzarella as desired. Add some shredded parmesan cheese if desired, then sprinkle with the chopped rosemary and sage. Bake as instructed in the above dough recipe.
Sauce and toppings make 2 large or 3 medium pizzas
To see all the luscious and creative pizza creations other Daring Bakers came up with..click on the links to their blogs HERE.
16 Comments »
RSS feed for comments on this post. TrackBack URI





 </
</


HUGE kudos to you!! – what an incredible thing you did…turning your injury into an opportunity to share a learning experience with others 🙂 Your pizza looks and sounds amazing, and it looks like everyone had a lot of fun! All the best for monday, my thoughts are with you for the speediest of recoveries!! xoxo
Comment by madcap cupcake— November 1, 2008 #
That’s fantastic what you did! The pizza looks delicious. Good luck with the surgery tomorrow, have a good recovery!
Comment by clumbsycookie— November 2, 2008 #
Wow, great pictures and pizzas! Very well done! It seems everyone enjoyed making that recipe…
Good luck with the surgery tomorrow.
Cheers,
Rosa
Comment by Rosa— November 2, 2008 #
Good job with your pizzas–and it’s great you had all that help in the rehab center!
Comment by Rebecca— November 2, 2008 #
What a cool thing to do! I hope your surgery goes well tomorrow. I’ll be thinking of you!
Comment by Nichole— November 2, 2008 #
What a great way to embrace the challenge. My hat’s off to you! Good luck with the knee surgery.
Comment by Y— November 2, 2008 #
Hope your surgery goes well! Cheers for still getting your challenge done and the roasted vegetables look amazing!
Comment by Esi— November 2, 2008 #
Good luck with your surgery. I’m confident the surgery will be a success. There has been so much work and improvements in knee surgery that it’s amazing!
Thinking of amazing… Congrats on teaching the class and completing your DB Challenge with only one leg.
Great photos and great looking pizza!
Comment by John (Eat4Fun)— November 3, 2008 #
I hope your surgery goes well. A very well done on your pizzas and looks like everyone had fun. Your pizzas look delicious. Btw I left you a reply on my post. Take care! 🙂
Comment by Lynn— November 3, 2008 #
You are such a trooper!!!! I got a kneecap surgery in 2005, so i sort of understand part of the pain… So glad you’ll have this surgery soon!
Thanks so much for visiting my blog. It was so encouraging to read your post!
I loved your pizza… what a great idea of roasted fall vegetables… yummmm!!!
Comment by Mohana— November 3, 2008 #
Your pizzas look delicious. Good luck with the surgery.
Comment by Ruth— November 3, 2008 #
I hope all went well with surgery! Your pictures from your pizza party are great. Looks like you all had a fun time.
I feel for you and the not being able to walk/cook/bake. I wasn’t nearly as imobile so it wasn’t as bad, but I was on crutches for 6 weeks, without any weight bearing. Hard to cook that way.
Here’s to a speedy recovery!
Comment by Karen— November 3, 2008 #
Kudos to you for completing the challenge under the circumstances! The pizzas looks delicious. I wish you all the best in your recovery…
Comment by Janet— November 5, 2008 #
Sounds so yummy! Love the recipe!
Comment by Laurie— November 6, 2008 #
If there was an award for the most heart warmin DB story that month, it’d be all yours!
Loved this!!
Comment by Tartelette— December 6, 2008 #
[…] had a glimmer of hope when a lovely lady from Poland (you can see her in my DB pizza entry – the blonde lady tossing the pizza dough), a recreational director/kitchen goddess at the rehab […]
Pingback by Would you like a Bib with your Pierogi? AND – The Ice Cream Maker Winner! « Parsley, Sage, Desserts and Line Drives— August 16, 2010 #