These Rolls are for the Birds – Six-Seed Garlic Onion Poolish Rolls and a Mardi Gras #Giveaway! GIVEAWAY CLOSED.
January 28, 2013 at 9:08 am | Posted in Bread Baking Day, Breads, Twelve Loaves, Yeastspotting | 261 CommentsTags: Biga, Bread, European Rolls, Flax Seed, garlic, Levain, Onion, Poolish, Poolish Rolls, Poppy Seeds, pumpkin seeds, Rolls, Sesame Seeds, Sunflower Seeds
I had the strangest thought the other day. Actually, it’s not too strange, it’s something I’m sure a lot of people think about, but I put a virtual spin on it. Wouldn’t it be great if our lives were equipped with system restore? I know, I know..many wouldn’t change a thing..happy with their lives, lessons learned etc etc etc, but for some, like me..I wouldn’t mind a few ‘safe points” to go back to. I have three in mind and those are three where I would take a tight left instead of a swooping right, at that proverbial fork in the road.
Two of these ‘safe points’ are pretty deep, but one is kind of trivial and you’re probably going to laugh. I wish I could go back to early 2009 and save Herbie, my super-duper, high-octane sourdough starter ‘who’ (it’s alive!) was a little over 2 years old when I started to neglect him.
I could have saved him…but I gave in and gave up because I had taken and continued to take a LONG break from artisan bread baking.
I did resurrect Herbie twice, using the same grape starter method by Nancy Silverton, (aptly named Herbie #2 and Herbie # 3), but, I killed #2 in a turned off oven I turned on..and #3 never really had a shot..I neglected ‘him’ from the start because I just wasn’t baking enough bread to properly nurture him.

OK, so to the point. During my years (mid-2006-2009) with Herbie #1 aka super powered Sourdough Starter, I was an artisan bread FA-NA-TIC. I had/have an amazing baking stone and a long-handled peel. I bought couches, bannetons/brotforms, special flours, barley malt powder and syrup, wheat bran, oat bran etc. I kept a drawer full of sharp razor blades and lames for slashing the dough (or any intruders) and an old, tattered roasting pan, for pouring water and/or ice cubes into for steam, which gives you that rustic, crisp crust.. lived on the floor of my oven, permanently.
I even purchased a ‘special’ spray bottle for misting the dough, depending on the recipe. It had a smiley face on it. It made me HAPPY.
Yeah, it doesn’t take much to make me happy.
My bread baking obsession intensified to the point where I split Herbie into several smaller starters…like firm starters, whole wheat starters, and oat starters. I coddled pieces of old dough from one bread to firm, bubbly life to make other breads. I was baking boules, loaves, baguettes, rolls…you name it, A LOT..and just about every.single day in 2008, up until I annihilated my knee late that September.

My kitchen had become a bread bakery. My signature scent was Eau de Wild Yeast and flour, my baby powder. I couldn’t seem to get either off of me completely, at least in my mind..and I liked it.
Once my obsession came to a screeching halt when I went down for the count with the mangled knee, I figured I’d start up again once I healed. Surprise! A mass of torn ligaments do NOT heal quickly if you don’t have rock-hard football player quads.
I don’t and would never want rock-hard football player quads, but that’s beside the point.
SO, after surgery and a year of grueling physical therapy – which I cut short, the desire to bake artisan breads ebbed. I figured it would be a long time before I got back into baking any breads that required much more effort than opening a packet of active dry yeast. I figured it would be a long time before I enjoyed intensely flavored, crusty, amazing crumbed breads unless I purchased them from an artisan bakery, but it still isn’t the same as ‘sculpting’ your own from the ground up and adding things you would never find in breads at commercial bakeries, to experiment and suit your taste.
BUT, then..a few weeks ago I laid eyes on these gorgeous German poolish rolls by Angie of Angie’s Recipes.
How could I forget? You don’t need super power starters that you have to build and nurture for weeks (and it takes even longer to bring it to that high-octane level), then continue to nurture forever, to get sensational, rustic breads – there’s a poolish, biga, levain, sponge..or whatever you want to call it. Anywhere from several hours to a day or two of fermentation, then you use it all in one bread recipe – no wild yeast sourdough starter, which can take weeks to develop when capturing the yeast yourself via the air, fruits etc.., blowing their last bubble of life when you quit on them.

Of course there was a bit of a caveat. You know me and metrics if you read my blog regularly. The gram switch on my scale is broken, not to mention I don’t trust my scale very much anyway. Yes, I know..time to shell out money for a new one, but until then, I needed a good hard roll recipe in US measurements (I also don’t trust online conversion charts – .000345678 cups of flour = what??).. and THIS ONE from King Arthur looked pretty close to Angie’s, so I used that. I changed the recipe a bit – making 6 large rolls instead of 12 small rolls, using bread flour, and I added sugar to the main dough because ‘yeasties’ looooove granulated sugar and feast on it ravenously, swelling up like the Stay-Puff Marshmallow Man – aka, big rise, big oven spring.
I also used the cold fermentation method a little differently than written in the recipe. After letting the dough rise at room temperature for 2 hours, I deflated it and let it do a slow rise for, well..it was supposed to be overnigh, two days at the most, but life got in the way, so I would come home..deflate it again..and let it do its slow rise..for almost 5 days.
I figured I probably killed it and would end up with flat, dense rolls..but much to my surprise..I didn’t, they puffed and puffed and puffed and felt sturdy, meaning lots of structure in the dough. Not to mention, the flavor and complexity of the dough intensified the longer it chilled, similar to the artisan breads from my year of obsessive bread baking.
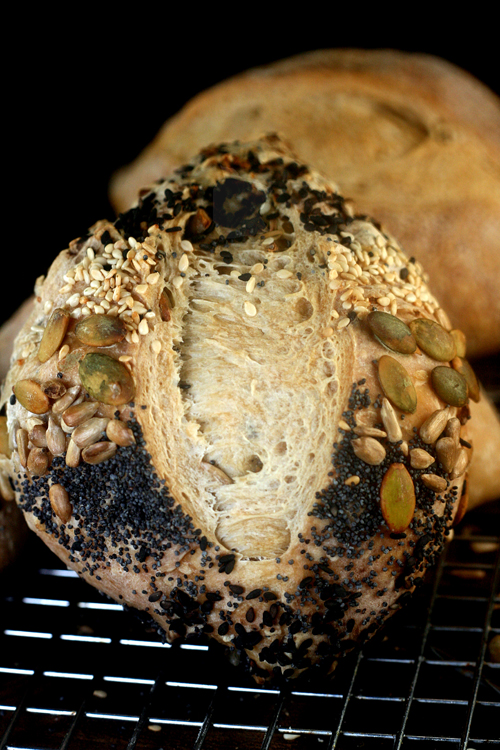
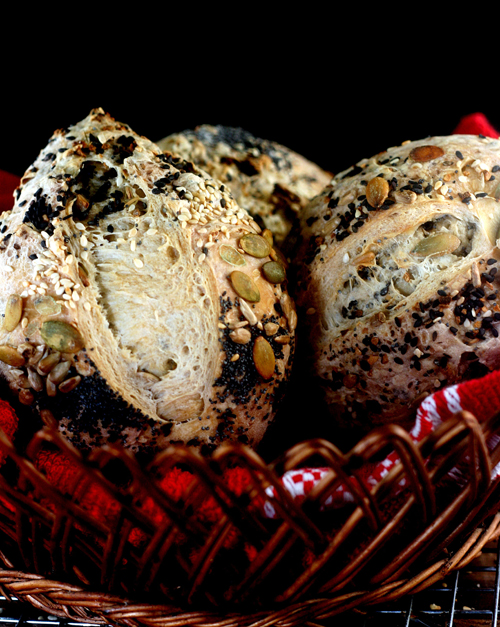
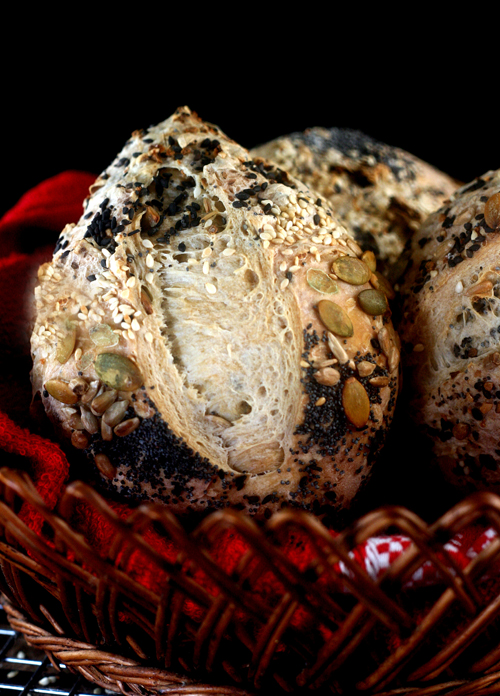
Here’s the best part – I kneaded 6 types of seeds, plus dehydrated garlic and onion into half the dough, you know, like ‘Everything Bagels’ but with A LOT more ‘everything’ – inside-out.
I’ve noticed that ‘Everything Bagels’ no longer give you a ton of ‘Everything’ like they used to, no matter where I buy them. Have any of you noticed the same in your necks of the woods?
Anyway…….
The seeds I used were; shelled sunflower kernels, pepitas (shelled pumpkin seeds), poppy seeds, black sesame seeds, white sesame seeds and flax seed. With the bits of garlic and onion, plus a sprinkling of fleur de sel on top, along with more seeds…I struck gold.

I tried to make a pretty design with the seeds to submit to Bread Baking Day #56, Decorative Breads, hosted by my dear friend, Jenni of The Gingered Whisk, but once baked, the design sort of came apart. I still think they look kind of cool, so what the heck! I’m submitting the plain rolls to the January Twelve Loaves, Simplicity, A Clean Slate, founded and hosted by another dear friend of mine, Lora from Cake Duchess.
I’m also submitting the seeded rolls to Yeastspotting..a weekly bread baking showcase hosted by Susan of Wild Yeast.
Six-Seed Garlic Onion (or not) Poolish Rolls
Adapted from King Arthur Flour
Makes 6 large rolls
Poolish
1/2 cup lukewarm water
1 cup Bread* or All-Purpose flour
1/8 teaspoon active dry yeast
Dough
all of the poolish
3 1/2 cups Bread* or All-Purpose flour
1 cup lukewarm water
1 tablespoon sugar
1 1/2 teaspoons salt
1/4 teaspoon active dry yeast
2 tablespoons, each; sunflower kernels, pumpkin seeds (green are shelled), flax seed, poppy seeds, black sesame seeds, white sesame seeds, dehydrated garlic and dehydrated onion..about 1/4 to 1/2 cup reserved for topping (optional..and you can use any combination of seeds, aromatics etc..you like) Save any leftover seed combo for other bread baking or uses..or just eat it) Use only 1 tablespoon of each if only adding the seed combo to half the batch of dough, like I did.
fleur de sel or coarse sea salt
1 cup hot water when ready to bake
* Bread flour is higher in gluten and will give you a chewier crumb and thicker crust than AP flour, which gives you a fluffier crumb and thinner crust. If using Bread Flour, you may have to increase the amount of water in the main dough. Go by feel.
DIRECTIONS:
1. Make Poolish – Sprinkle yeast over water – let dissolve then stir in flour until incorporated. Cover and let it do it’s thing at room temperature overnight. The surface should be covered with little bubbles after several hours.
2. Using your hands, a hand mixer, stand mixer or bread machine dough cycle (ingredients in the order suggested by the manufacturer) combine the poolish with the all of the dough ingredients until no longer sticky. If you’re using the seeds, garlic and onion, knead in 1/2 to 3/4 cup of it once you have a cohesive dough. They will keep popping out, but just keep kneading and shoving them back in (a stand mixer or bread machine knead makes this part easy).
3. Continue to knead the dough until somewhat smooth and elastic (it won’t feel smooth with all the seeds, IF you used the seeds). Place it in a lightly oiled bowl, cover and let rise at room temperature for 2 to 3 hours.
3. After the room temperature rise..fold the dough down to deflate it, then cover the bowl again and let rise in the refrigerator overnight.
4. Remove the dough from the refrigerator and on a floured board, divide the cold dough into 6 equal pieces. You can weigh each piece or just eyeball it. It doesn’t matter if they’re EXACTLY the same size, but you want it close. Take one piece of dough at a time..covering the remaining pieces with plastic wrap, and shape into balls or torpedos or teardrops (A torpedo with only one end tapered). I’ve linked both shapes to videos on how to do it to get maximum rise, oven-spring and spread/bloom from the slash.
5. Place each shaped roll on a parchment lined baking sheet (I used a 12 x 17 cookie sheet to fit them all without the chance of them touching while rising), then cover with lightly oiled plastic wrap. You will need two or three pieces to cover them all sufficiently so no air seeps in, but you want to give them room to rise, so cover loosely but tuck ends of plastic wrap under baking sheet. Let rise two to three hours, They should double in size, as you see in my photos.
6. About 30 minutes before the final rise is finished, place an old roasting pan or cast-iron skillet on the floor of the oven. Pull out all the racks except the middle rack, where you will be placing the baking sheet. Preheat the oven to 450 degrees F.
7. Uncover the rolls. If you’re using the seed, garlic, onion mixture, lightly spray or brush a little water on each roll, and top with reserved seed mixture, then sprinkle lightly with fleur de sel or coarse sea salt. The water will help it all stick. Give the rolls a light dusting of flour..so whatever blade you’re using doesn’t stick to the dough when slashing.
8. Using a super sharp chef’s or serrated knife, razor blade or lame..slash each roll about 1/4-inch deep down the center (vertically for torpedo rolls). It should start to open within seconds and you’ll see the lovely, bubbly structure of your dough in the slit, which is a good sign. If your blade isn’t super sharp..like ‘cut paper’ sharp, you will tear and deflate your beautiful rise, plus, you won’t get maximum oven-spring or that beautiful spread down the center which gives you a light, fluffy interior. Here’s a video on how to slash risen bread dough,
9. Have ready 1 cup of hot water. Open the oven door and quickly slide the baking sheet with the rolls onto the middle rack, horizontally so they bake evenly..then quickly pour the hot water into the pan or skillet on the oven floor. You should hear a sizzle sound. Shut the oven door immediately. The steam from the water is what gives you an amazing crust.
10. Bake for 25 to 30 minutes until the rolls are golden brown. You may not be able to tell with the ones coated with seeds, but the center of the roll where you slashed it will be wide open and lightly colored (the seeds make it look lighter..as opposed to plain rolls). Remove rolls from the oven and immediately place them on a baking rack to cool. Enjoy hot or cooled down!
In a few days I will have an amazing tuna or chicken salad sandwich recipe, using the seeded rolls.
Now to the GIVEAWAY! Just in time for Mardi Gras! I’m SO excited about this one because I’ve only heard amazing things about Sucre in New Orleans, especially their handcrafted macarons. Go look while I wait. *tapping fingers*
Don’t they look incredible?

Patty from Sucre contacted me and asked if I’d like to host a giveaway for one of their AMAZING King Cakes plus a bag of Fresh Pecan Praline Roasted Coffee. She sent one to me to try, and let me tell you, having never tried an ‘official’ King Cake before, I’m now hooked. There’s a reason the Washington Post called it the BEST King Cake!
We received it in the mail Friday and it looked even better than the photo, plus it was bigger! They even included the plastic baby and beads. If you feel so inclined, you could wear the beads while you eat it.
I did.

Once it was opened, we started to slice it with a knife neatly and equally. One bite and we turned into savages and tore pieces off. It was gone in 20 minutes! The two tiny pieces left, in the last photo, I had to beg for, then rip from eager hands just to show you all how fast it went!
I WISH I had another one. Moist, lightly sweet bread with a thick tunnel of creole cream cheese running through it. O.M.G. OH, and the glaze..it was perfect! Again..I wish I had another one, do you hear me, Patty??
I’m not a coffee drinker, but I couldn’t resist tasting the Pecan Praline Roasted Coffee. It was the best coffee I ever had, but, again, I don’t drink coffee. However, according to everyone it was “incredible”. ‘slammin’, “best flavored coffee I ever had” etc.

SO, here’s how to win this luscious King Cake and coffee. Just leave a comment..it’s as simple as that. For bonus entries;
1. Like Sucre on Facebook
2. Follow Parsley, Sage & Sweet on Twitter
3. Tweet this Giveaway – Win a King Cake & Pecan Praline Roasted Coffee from Sucre in New Orleans. Leave a comment for a chance to win! http://tinyurl.com/adavm9c
Please leave a separate comment for each bonus entry.
This Giveaway ends Monday, February 4th, 2013 at 11:59 pm EST. A winner will be chosen using random.org. If I don’t hear back from the winner in three days after the announcement, another winner will be chose
UPDATE: My friend, Megan of Delicious Dishings is also giving away a King Cake and Pecan Praline coffee from Sucre, so for a second chance to win, pop on over to her GIVEAWAY and leave a comment! Her giveaway ends at 11:59 p.m. EST on Sunday, which is tomorrow, so hurry!
Share this:

Maple Brined Ancho-Scallion Boneless Turkey Breast with Apple-Butter Pecan Stuffing
November 18, 2012 at 2:11 pm | Posted in Breads, Daring Cooks, Dinner, Holiday, Poultry, Vegetables | 53 CommentsTags: Ancho Peppers, apples, Brining Turkey, Butter Pecan, Hurricane Sandy, Recipe, Stuffed Turkey Breast, Stuffing, Thanksgiving, Turkey, Whole Boneless Turkey Breast
Damn, I thought Thanksgiving was the 29th because Thanksgiving is usually the last Thursday in November. Oh, boy, this is the trick of the trick of treat for real…the ultimate “Ha ha…you better get your ass in gear, Lisa!” moment. I think Hurricane Sandy left me a little off-kilter, but I’ll get to that later.

You see, for this month’s Daring Cook’s challenge, which is all about brining meat and/or vegetables, then roasting, which I’m late to as usual, I decided to brine a whole turkey breast, then layer it with more flavors – like a a compound butter rub, THEN stuff, roll, and tie it…for a lovely Thanksgiving treat for those who don’t want to roast a whole turkey.
Audax of Audax Artifax was our November 2012 Daring Cooks’ host. Audax has brought us into the world of brining and roasting, where we brined meat and vegetables and roasted them afterwards for a delicious meal!
 I didn’t have a bowl or bag big enough to fit the turkey and brine, see left, so I ended up using a huge pot..right.
Well, well, well..this is dinner Friday night, the 16th.. and in less than one week..we will have turkey again..a whole 20 lb turkey. Because of this turkey breast, I would love to just roast some chickens and be done with it.
“Why did you buy such small turkeys?” OK, no one in my family is that dumb.
There’s no way I can break tradition here, so more turkey it is. Yippee.

I love to brine meat, from chicken to pork chops and I most always brine Thanksgiving turkeys. The well-seasoned juicy factor from brining is simply amazing and I can’t think of another method that can give you meat this juicy, unless Thomas Keller is in your kitchen. (Ha ha! I just read the Thomas Keller/Juicy Meat blurb again and realized how it sounds!)
This turkey breast is so loaded with flavor, I don’t know how I can match it and I wish I could make it again for Thanksgiving. First you’ve got the salty maple, brown sugar brine with bay leaves, garlic and peppercorns seasoning it to perfection. Then you have an ancho pepper-scallion-garlic butter rub beneath and on top of the skin. The stuffing is the crème de la crème..with apples, buttered and toasted pecans, and of course..the usual sauté of onions, herbs and whatever else you want to add to your ‘custom’ mirepoix. It’s not always celery, carrots and onions IF you don’t want it to be. No rules!
Oh, what are ancho peppers? Dried poblano peppers and they taste like spicy raisins, but impart such a lovely, slightly spicy/smoky undertone to dishes. You can find them in plastic packages in many supermarkets.

I nixed celery. I almost always nix celery in stuffing, or just add a small amount. I like celery raw and crisp, but I don’t flip over it cooked. I don’t think it adds much to dishes flavor wise when cooked, except chicken soup..and that’s only because I’m superstitious and believe it’s part of the secret penicillin that makes you feel better.
Tied up and roasted, this turkey breast is a picnic on the palate (did I really just type that? Boy, I’m worse off than I thought) and as juicy as a warm peach right off the tree (Did I really type that too?)..so all you really need is a side of mashed potatoes and a vegetable..but of course you can add as many sides as you want (I cannot have Thanksgiving without candied sweet potatoes). There will be extra stuffing, but use any stuffing you like for this roast…I’m just giving you the recipe for mine because it’s perfect for this rolled turkey breast, even though I saturated it with chicken stock so the breast would be easier to roll.
By the way…I know I say this a lot, but I’m going to say it again and I can’t say it enough. This is the best stuffed turkey breast I’ve ever had in my life. You know when something tastes so good that no matter how full you are, you keep eating it? This is one of those.
 Who says ugly can’t be delicious? I’ve had ‘beautiful’ that tastes like pond scum, or how I imagine pond scum would taste.
OK…a GASP moment. Once again, this turkey breast is so juicy due to the brining, it doesn’t need gravy, the holy grail of Thanksgiving. BUT, you could make a pan gravy out of the drippings with some butter, flour, white wine and/or stock, because I’m sure at least one person might protest.
Maple Brined, Ancho-Scallion Boneless Turkey Breast with Apple-Butter Pecan Stuffing
Maple Brine
3 quarts water
1 cup pure maple syrup
1/2 cup packed light brown sugar
3/4 cup kosher salt
2 turkish bay leaves
1 tablespoon whole black peppercorns
2 garlic cloves, sliced
One 3 to 3 1/2 lb whole, boneless turkey breast with skin, butterflied, if necessary, and pounded to about 1/2-inch to 1-inch thickness.
If you can’t find a whole, rolled,boneless turkey breast with skin in your meat section, buy a whole turkey and have the butcher cut it off for you (which is what I did..using the rest of the turkey for roasted legs and stock)..or do it yourself if you feel comfortable.
DIRECTIONS:
1. Bring all the ingredients, except the turkey breast, to a boil in a pot on the stove..until sugar is dissolved. Let cool completely, then refrigerate until cold.
2. Pour brine into a pot or gallon bag and add turkey breast. Let brine in the refrigerator 4 to 6 hours…no more than 8!
4. Remove turkey breast from brine and rinse well under cold, running water. Pat completely dry and continue with recipe.
Ancho-Scallion Butter Rub
Adapted from Food and Wine
6 tablespoons unsalted butter
2 ancho peppers, stemmed and seeded
6 scallions, chopped
2 garlic cloves
Kosher salt and pepper
DIRECTIONS:
1. In a small skillet, toast the ancho chiles until they just start to blister, about 4 minutes. Place the chiles to a small bowl and pour boiling water on top of them to cover. Let stand for 15 minutes. Drain and pat dry.
2. In a food processor, combine the chiles, butter, garlic and the chopped scallions and purée until smooth. Season well with salt and pepper. Carefully loosen the turkey breast skin and rub half of the ancho-scallion butter over the breast meat. I decided not to loosen the turkey skin since I didn’t want to risk tearing it. You need the skin to cover as much as the breast as possible when rolling it, so I rubbed some on the pounded breast meat before spreading the stuffing on top. Let sit until ready to stuff, roll and tie.
Butter Pecan – Apple Stuffing
6 tablespoons of butter, divided 4 and 2.
A few leaves of fresh sage, julienned and chopped
leaves off of 4 sprigs of fresh thyme
1/4 bunch fresh flat-leaf parsley, roughly chopped
1 large onion, chopped
2 garlic cloves, minced
1 leek, cleaned well and chopped
Kosher salt and freshly ground black pepper
2 Granny Smith apples, peeled, cored and chopped
1 1/2 cups chopped pecans
4 tablespoons melted butter
1/4 cup heavy cream
1 to 1 1/2 cups low-sodium chicken stock
5 cups day old bread of your choice (I used ciabatta, crusts removed), hand torn or cut into 2-inch cubes. If not day old, oven-dry at 200F for about an hour or two, after tearing or cutting into cubes.
DIRECTIONS:
1. Stir together chopped pecans and 1/4 cup melted butter. Spread in an even layer on a parchment lined sheet pan. Bake at 350° for 15 – 20 minutes, stirring them round once half way through. until pecans are toasted (you’ll be able to smell them). Remove from oven, and let cool.
2. Place bread cubes or pieces in a large bowl. Melt 4 tablespoons of butter in a large sauté pan and add the onions, leeks and garlic. Saute until soft. Pour on top of bread. Melt two tablespoons of butter in the same pan and sauté the apples until lightly browned. Add the herbs and sauté for another two minutes. Scrape it all into bowl with the bread, onions, leeks and garlic. Stir in buttered pecans.
3. Stir together chicken broth or stock and cream. Warm in a pot on the stove,. Season with salt and pepper to taste, then pour over stuffing mixture in bowl. IMPORTANT – the juices from the turkey will moisten the stuffing, so if you like a really moist stuffing, add all the chicken broth-cream mixture like I did, which makes the turkey breast easier to roll. If not, add liquid until it’s the consistency you prefer, and use less in the turkey.
4. Let cool completely before stuffing turkey breast ( I refrigerate it for 1 hour after it cools to room temperature)..or, you can bake this stuffing on its own. Spoon into a lightly buttered baking dish, cover with buttered foil, and bake in a 350 F preheated oven for about 35 minutes, then remove foil and bake for 10-15 minutes more to brown the top. Since you will have leftover stuffing, you’ll need to do this anyway.
ASSEMBLE:
1. Make sure the two breasts attached to the skin are pounded flat enough that they come together. I recommend you have someone really strong or your butcher do this because I had a hell of a time and never got them pounded together or as flat as I wanted, not to mention, my arm still hurts.
2. Skin side down, rub the meat with half the ancho-scallion butter, then spread about two to three cups of stuffing all over the meat…pushing it to about 1-inch from the ends of the pounded meat. Make sure you don’t spread it to the skin, since it will ooze out when you roll it. Some will ooze out anyway..but don’t worry about it.
3. From the long end..start to roll the breast, pulling the skin so it covers as you roll. It won’t cover completely, but that’s ok. Once rolled as much as you can roll it without losing half your stuffing…using cotton twine, tie the roast at 1 to 2-inch intervals. There are various methods of doing this…like THIS and THIS, but since my stuffing was oozing and the skin wasn’t covering completely, I just made simple double knot ties 2-inches apart, using about 6 pieces of long twine. To make it more secure, I also tied it vertically by taking an extra long piece of twine and weaving it through the horizontal ties on both sides….tying both ends of the twine together, tightly, on one end. Preheat oven to 400F.
3. Place rolled turkey breast on a lightly oiled rack in a roasting pan or on a baking sheet covered with foil. Rub the tied roast..all over..top and bottom, lifting as you go along, with the remaining ancho – scallion butter.
4. Place on the middle rack of your oven, and roast for 20 minutes, or until it starts to brown. Reduce the temperature to 350F and roast for another 35 to 40 minutes or until an instant read thermometer registers 155 degrees F in the middle. If not stuffing the breast…roast until it registers 145 degrees F.
5. Let rolled breast sit for 20 minutes before slicing..then slice into about 1/2 to 1-inch slices and arrange on a platter. Enjoy!

Now to Hurricane Sandy, originally dubbed ‘Frankenstorm’. By now you know the devastation it caused throughout the Northeast. We were lucky, since we’re up on the Palisades, so the water couldn’t touch us, but it was scary. Branches and god knows what else were slamming against the side of my house hard and fast. There were even points where I could feel the whole house shake, like it was going to be lifted off its foundation. I kept waiting for a tree to come through the roof, but thankfully, none did.
We were also lucky that we didn’t lose power for good. We had sporadic power losses, but by midnight, our power stayed on for good. The other side of my town lost power for almost two weeks.
However…the devastation around me and down the shore was of a magnitude I still can’t believe and it’s heartbreaking. Two friends did have trees smash down on their roofs and the sides of their houses, and in the weeks since the hurricane, I’m still hearing of friends whose houses were destroyed or battered to the point of being unlivable, especially old friends who live on the Jersey Shore.
Speaking of the Jersey Shore..my heart is broken. Seaside Heights, the place where my Bad Boy First Love Story began and spanned, and the place of so many wonderful memories, is gone as I knew it. Yes they will rebuild, but to those of us who grew up spending summers at the shore..it will never be the same. Most of Seaside was built before I was even born..including the over 100 year old carousel on the Casino Pier, which is gone forever.
At the top of this page in the right sidebar..I’ve provided a link to donate money to help the victims of Hurricane Sandy via the Red Cross. Here are some other places you can donate to..
Hurricane Sandy NJ Relief Fund
United Way Sandy Recovery Fund
The Humane Society of the United States
Donations will be needed for a long, long time, so I urge you to give what you can. Any amount of money will help.
Speaking of the Jersey Shore...several people read my last draft of the last part of Bad Boy First Love and all agreed everything was squished together in short spurts to try to end it. “Needs more details” was the general consensus. SO, I’m adding more details and there’s a good possibility the ‘end’ will come in two parts, so part 18 may not be the very last (Oy Ve, right?) I will have part 18 up early next week at the latest. Thanks so much for your patience and understanding.

Finally, thank to Audax for a great Daring Cooks challenge (Sorry it’s 4 days late!). To see what my fellow Daring Bakers brined and roasted, click on the links to their blogs, HERE. To see the recipes and read about the method of brining meats and vegetables, along with charts. click HERE.
Share this:

Oatmeal Walnut Bread with Poppy Seeds and the Best Egg Salad You Will Ever Eat!
October 18, 2012 at 5:25 am | Posted in Breads, Lunch, Salads, Twelve Loaves, Yeastspotting | 55 CommentsTags: baking, Bread, Egg Salad, eggs, garlic, Mayonnaise, Oatmeal, oatmeal Walnut Bread, Poppy Seeds, Recipe, Red Star Yeast, Soft-Boiled Eggs, Sriracha Egg Salad, Sriracha. Scallions, Toasted Walnuts, Walnuts
OK, OK…the best egg salad you will ever eat IF you like medium soft-boiled eggs and Asian hot sauce!
So World Bread Day was two days ago. Does it count since I put my post up two days late? Of course not, but for those who participated, know I was there with you in spirit while this bread sat in a photo program for a week. I actually made this bread for this month’s (October) Twelve Loaves theme, seeds and grains, hosted by Lora of Cake Duchess, Jamie of Life’s a Feast and Barbara of Creative Culinary – but there’s a reason for the that little gem ‘Breaking Bread’ – bread…and food in general, is meant to be shared and enjoyed with and by all.

Bread..bread..bread – yeast, yeast, yeast. I love baking bread..I always did. The first time I ever worked with yeast was in the second grade. My elementary school set aside one morning each year to teach all second grade classes how to prepare a breakfast from scratch, including the bread for the toast. There was an egg station, a bacon station (that would never go over today. Jamie Oliver would cry), a freshly squeezed orange juice station and a homemade bread station.
You guessed it..I was assigned to the bread station. My partner in bread was a tough, little kid named Vinny with suspicious blue eyes and lightly tousled blonde hair. He liked to beat up other kids for fun..and the exhilaration in his eyes when he stomped on insects was a little more than disturbing. He also liked to throw rocks at anything that moved, including people. Thankfully, he had terrible aim.

Naturally, I was afraid of him..until he started dipping his fingers in the bubbling cake yeast and smelling them, over and over… his usual dead, scary eyes suddenly sparkling . He really took to baking bread from scratch and kneaded dough like a pro. I was in awe.
For the remainder of second grade, the perpetually silent Vinny, in a barely audible, monotone voice, would ask the same question almost every day…
“Are we gonna bake bread today?”
To this day..the smell of foaming cake yeast reminds me of Vinny. I’m convinced he’s now a bread baker with his own little bakery..or baking for his fellow inmates via kitchen duty.
Initially I was going to make the third yeast bread I ever baked, which was an Onion Lover’s Twist with poppy and sesame seeds from a Pillsbury Bake-Off cookbook that was given to me at the age of 13. I changed my mind because I wanted a hearty, healthy sandwich bread for a wicked egg salad I’ve made since I was a kid, albeit, without the wicked part. That came later, when my palate could suddenly tolerate it.
I didn’t bake my second yeast bread or any yeast bread from the book until I was 18..and let’s just say it was a little ambitious for a second yeast bread, especially with no teacher or yeast-loving future bread baker and/or mobster, to help ..choosing a pizza rustica, loaded with meats and cheeses, the yeast dough lining and covering all the filling in a springform pan. The recipe said it needed to rise in a warm place..so I placed it in front of the super hot radiator on the floor of the den where I was watching TV..staring at it..willing it to rise.

I was making this yeasted pizza rustica to impress Dreamboat. It had to be perfect.
When I was finally satisfied that it might be starting to rise..I focused my attention on a movie that was on, forgetting about it for the hour it needed.
Well, rise it did..very quickly…over the top of the springform pan, knocking off the plastic wrap….crawling across the floor to the rug like The Blob, The Blob who hadn’t blobbed in days and was starving for a victim to digest into its gelatinous core of evil.
 The proper consistency of the yolk for this egg salad is the soft-medium, circled and arrowed in red. However, I find 6 to 7 minutes gives me that consistency, not 5.5 minutes. Photo courtesy of ieatishotipost.sg since my egg photos had a bluish tint I couldn’t get rid of.
I jumped up to get to it before it hit the rug, but truthfully, I was more concerned about the pizza rustica loaf turning out. I quickly gathered up the blobs of dough..some of it already dry from a good 20 minutes exposed to the air…seeping down the circumference of the pan and tried to smush it back on top. I had to do this twice..ripping off so much dough that had hit the floor that there was barely enough dough to sufficiently cover the top. After another hour, there was little rise..the radiator and my ripping and scrunching the dough down had annihilated it, but I baked it anyway. Surprisingly, it turned out beautiful.
Not so surprising, Dreamboat almost broke a tooth at first bite. Beauty is only skin deep. The top crust was as hard as a rock. We pulled the cheese and meats out, ate those..and that was that. I’m sure he thought I’d never excel at bread baking. I kind of felt the same way.

Once I learned, the hard way, that there was no need to let bread rise next to a steaming, hot radiator, I had much success thereafter.
With that said..you all know I’ve been pinning food like a maniac, right? Naturally, you pin recipes because you want to try them and/or it makes your creative juices bubble like hydrogen peroxide on a brand new boo-boo. So, I follow Red Star Yeast, and I cannot tell you how many times I’ve repinned their bread, sweet and savory.. and sandwich pins. When I came across a pin for their Oatmeal Walnut bread..I had to try it. I couldn’t find their Platinum Yeast anywhere near me, which was a shock..but I did find it miles and miles away at another market when visiting a friend.
The loaf, which contains 1 cup of whole wheat flour, didn’t rise very high over the top of the bread pan, but I expected that since most bread doughs with whole wheat or other whole grain flours are heavy. BUT, was I in for a surprise..major oven spring! I guess the platinum yeast is sort of like bread kryptonite! Oh, did I mention that this bread is delicious and the texture wonderfully dense, but soft with the slight crunch of walnuts and poppy seeds (which I added to the recipe)? Perfect for a sandwich..like my egg salad…or just ripping off pieces and enjoying as is..since the light molasses flavor is lovely.

Finally, my egg salad. My mother, who hated cooking and baking, still had a skill or two up her sleeve, like hard boiling eggs. All of my friends loved her egg salad. Her secret? Miracle Whip. Their mothers used Hellmans, which I preferred once I tasted it. I never looked back at the whip again.
That said, I prefer my eggs soft or medium soft-boiled aka kind of yolky. I was never able to find egg salad that way – anywhere..from home to school, to friend’s houses to the markets/deli’s my mother would buy it from occasionally. The eggs were always hard-boiled..so I took it upon myself to make it the way I liked it.
When I developed a palate that begged for hot and spicy in my late 20’s..I started adding sriracha or chili garlic sauce to my semi-soft boiled egg salad. Both make it even more amazing than it already is.,.IF you like hot and spicy. You can leave out the hot sauce if you like because this egg salad is the best..in my opinion..with or without it. You can also hard boil your eggs, but that would take away the oozing part of the yolk which becomes part of the dressing – the true twist and secret to its greatness.
Finally..I like my egg salad chunky..chunky to the point where you need lots of napkins because pieces of egg usually fall out as you bite into it, but how small or large you cut your egg up is entirely up to you. As you can see in the photos..I just about quarter each egg..and as you can also see in the photos, I piled the entire recipe for this egg salad on one sandwich. Yes..I have prepared it this way for myself many times, but most of the time I put half of it on a sandwich and eat the rest out of the bowl. My cholesterol was normal the last time I gave blood..well over a year ago. OK, I’ll stop now.
 Why not add more cholesterol – like BACON? The lettuce makes it healthy, right?
Recipe for Oatmeal Walnut Bread – I toasted the walnuts and added poppy seeds on top along with the oats.
Semi-Soft Boiled Chunky Sriracha Egg Salad
Makes enough for one monster-sized sandwich or two human-sized sandwiches
4 medium-soft boiled eggs, peeled under cold running water, dried and cut up
2 to 3 tablespoons mayonnaise OR Greek Yogurt
1/2 teaspoon garlic powder (If I have a head of roasted garlic on hand, I mash in a clove of that instead of the powder)
2 to 3 tablespoons sriracha or chili garlic sauce depending on how much heat you like. Omit this if you don’t like heat and add another tablespoon of mayonnaise or try BBQ sauce!
1 to 2 scallions, green and white parts, chopped
kosher salt and fresh ground black pepper to taste
DIRECTIONS:
1. Place the chopped eggs and chopped scallions in a medium bowl. In a separate bowl, combine the mayonnaise with the garlic powder and sriracha or chili garlic sauce until uniform. Mix this dressing with the chopped eg and scallions. Season to taste.
2. You can eat immediately, but I like to cover the bowl with plastic wrap and let the flavors perform magic in the fridge for a few hours. Serve as sandwiches, on a salad platter, or just eat as is.

I’m also submitting this bread to the BYOB bread baking event hosted by Heather from Girlichef, Michelle from Delectable Musings and Connie from My Discovery of Bread, plus Yeastspotting hosted by Susan of Wild Yeast.
Share this:

-


-

My Flickr Photos
-

-


-

Challenges and Blog Events
-
-

-

-

Parsley, Sage and Sweet by Lisa Michele is licensed under a Creative Commons Attribution-No Derivative Works 3.0 United States License. -

-


 </
</

